Forwarding Time Slots and Bookings - Shipper
 Updated 2 months ago
by
Katarzyna
Updated 2 months ago
by
Katarzyna
In this article, you will learn how to:
- improve cooperation with carriers and enable smooth forwarding of time slots and bookings between subsequent contractors,
- maintain full control and transparency thanks to insight into the forwarding history,
- decide who and when can forward bookings and time slots further,
The feature allows carriers to forward bookings and assigned time slots to their subcontractors. Thanks to this, data is completed directly by the company performing the transport.
The feature is active only when the shipper enables it in the settings.
Manage forwarding of bookings and time slots
- Click the avatar.
- Go to Settings.
- Select Schedules and then Forwarding.
Here you can manage the settings:
- Default forwarding permission Enables or disables the ability to forward bookings and time slots by carriers. If the option is disabled, carriers cannot forward time slots and bookings received from you.
- Default carrier data requirement Determines whether you will receive data of the company that ultimately performs the transport (i.e., the one that made the booking on the forwarded booking or time slot).
Creating a time slot or booking with forwarding enabled
- In the Schedules module, click Add time slot or Add booking
- In the form, go to the Forwarding section (click Expand/Collapse if hidden).
- Options are selected according to your global settings. You can change them for this specific case.
- Allow further forwarding Disable this option if you do not want the carrier (or its subcontractors) to forward the data further.
- Require booked carrier data When enabled, you will see the data of the company that will ultimately perform the transport.
Monitoring forwarding status
In the booking details, you can:
- check whether it has been forwarded,
- see forwarding indicators,
- view the final carrier data,
- booking/time slot details – to check them:
- Click the created time slot or booking and expand details.
- You will see which forwarding settings were enabled for this item.
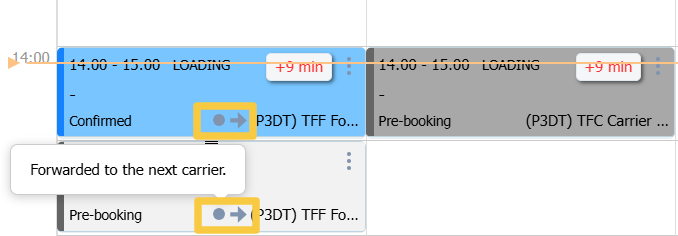
- If the carrier forwards it further, the annotation in details will change, and an icon (dot with arrow) will appear in the Forwarding column.
How to enable forwarding in an existing time slot or booking?
- Go to the details of the time slot or booking,
- click More > Edit time slot / Edit data,
- go to the Forwarding section,
- select the appropriate checkbox to enable forwarding.
Revoking forwarding permission
You can disable forwarding permission for existing time slots or bookings at any time.
To do this:
- Select the time slot or booking you want to edit.
- Click More, then Edit time slot / Edit data (for booking).
- Go to the Forwarding section.
- Uncheck Allow further forwarding.
- Save changes.
◦ Companies that already received the time slot/booking lose the ability to forward it further.
◦ The first carrier in the chain will receive an email notification about the change.
◦ Subsequent carriers will receive an email notification about removal, as they lose access.
Adding a forwarding column to the list
If you want to see forwarding information in the list, you can add a new column.
- Go to Schedules and select Bookings or Time slots.
- Click the three dots icon and enable Forwarding.
Bookings and time slots that have been forwarded will be marked with a dot-with-arrow icon in the Forwarding column.

FAQ
Is forwarding enabled by default?
Yes, the feature is enabled by default, but you can disable it globally or for specific cases.
Do I see the full forwarding history?
As a Shipper, you see the forwarding indicator and the final carrier data (if enabled), but not intermediate companies.
What happens when I revoke forwarding permission?
Carriers lose forwarding ability. The first carrier gets a change notification, others receive removal notification.
What is the maximum forwarding limit?
Maximum 10 times across the entire chain.