Booking management
 Updated 1 month ago
by
Katarzyna
Updated 1 month ago
by
Katarzyna
|
Who can use this function? Function available for users of the CargoON product line who have the Dock Scheduler product and access to the Schedules module. |
From the article you will learn:
- how to manage bookings,
- how to add a booking for a carrier,
- how to edit and delete a booking.
The system involves the automation of warehouse operations and focuses on optimising processes on the shipper's side.
Booking created from a time slot
When you create a time slot and the carrier or shipper selects a booking date and time, a pre-booking is added to your schedule.
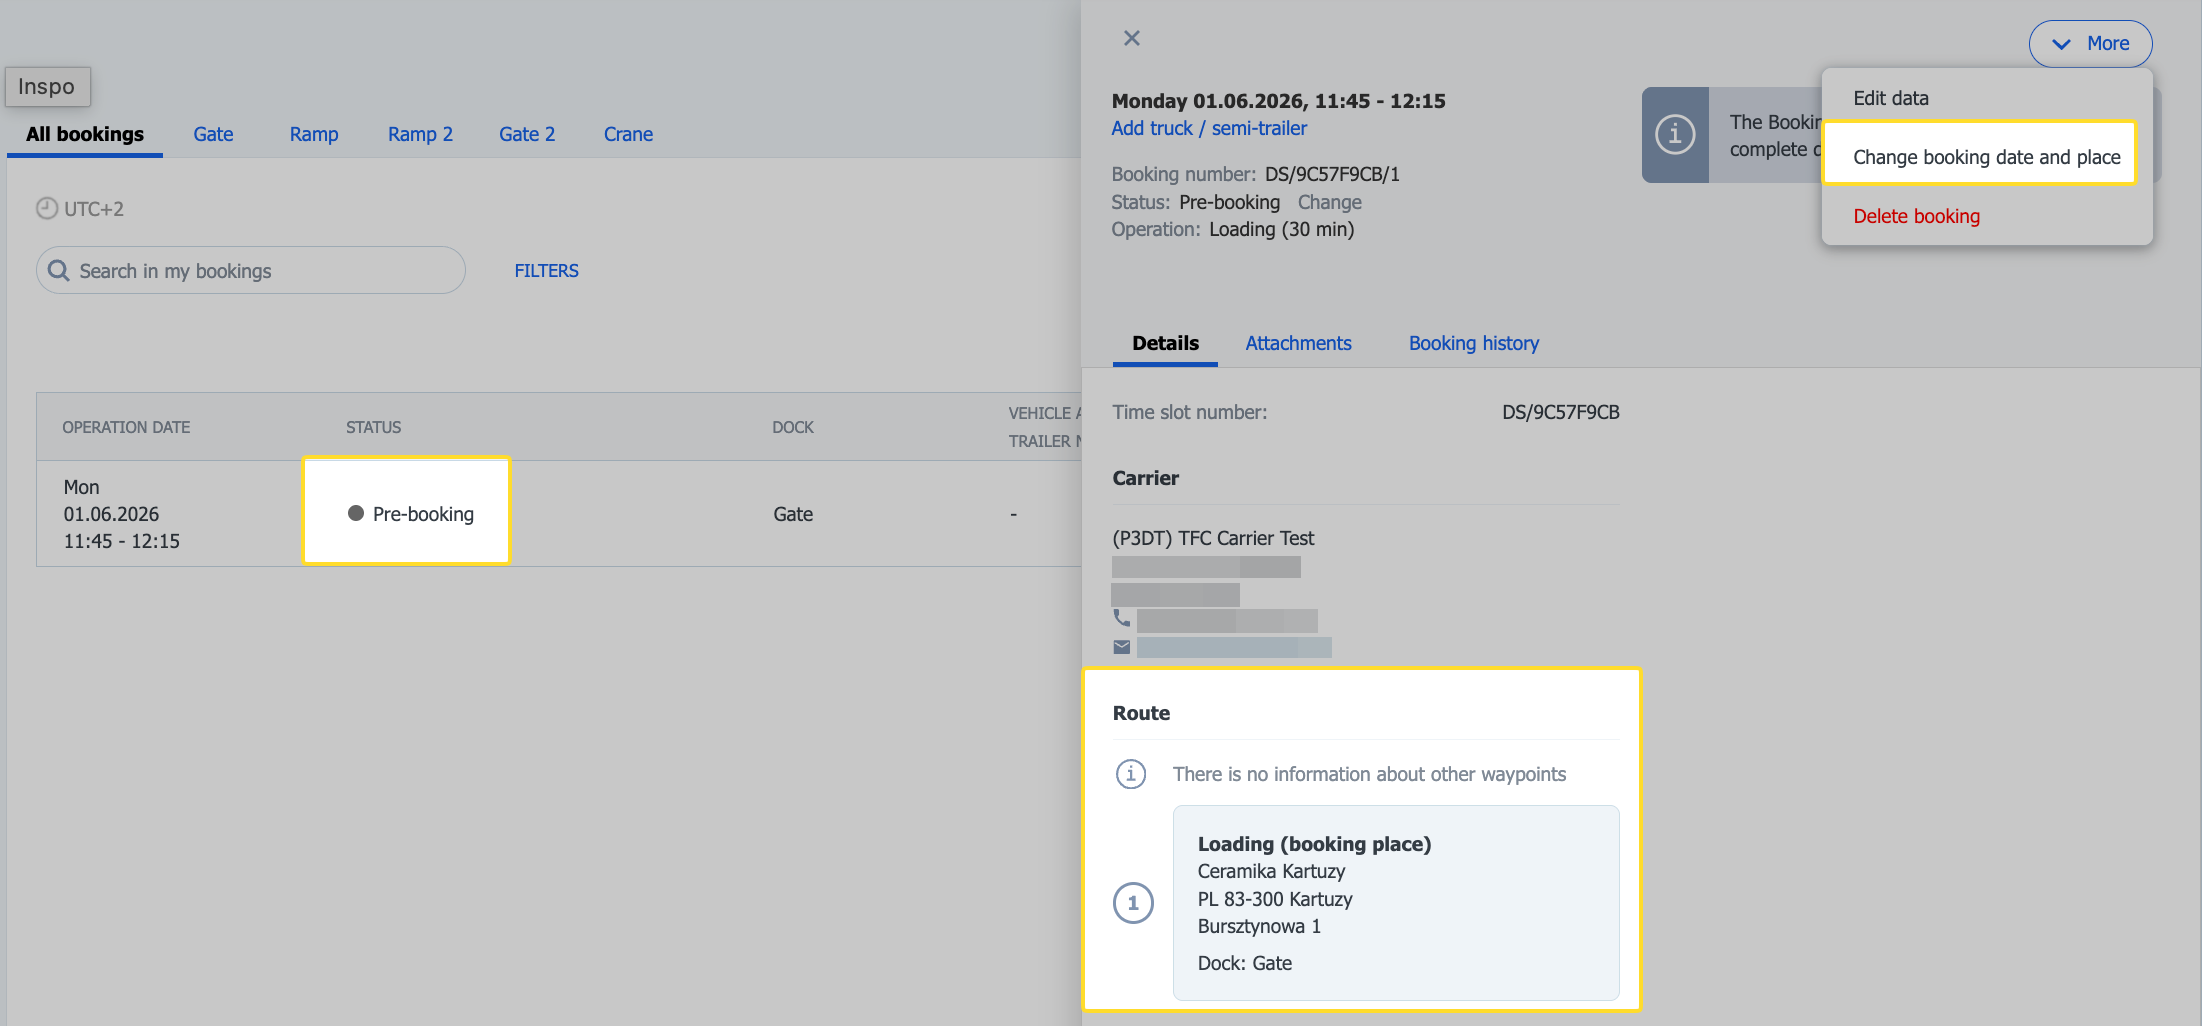
- Go to your warehouse schedule to find the pre-booking.

- Click on the three dots icon to:
- change the date and place of the booking,
- edit data,
- delete a booking.
If you do not wish to perform any of the above actions, wait for the carrier to add the vehicle details to the booking.

- Once the carrier has entered the vehicle details, the booking status will change to Confirmed. Click on the three dots icon to:
- Confirm arrival,
- Refuse loading (provide reason for refusal)
- Change the booking date and place (date, time, dock or operation type),
- Edit data (driver and vehicle details, as well as the shipper's remarks - visible to the carrier, or internal comments - visible to co-workers only, attachments).
- Delete a booking (irreversible action)

- Click on a particular booking to display its details.
In the details window, you can confirm the arrival of the vehicle - Confirm arrival - or edit the data, add comments or refuse loading. You can find these actions by clicking on the More button.

Add a booking as a shipper
You can also add a booking to your schedule yourself.
- In the Schedules module, click the Add booking button.

- Complete the details in the form to add a booking.

- External reference no. - optional field. You can add the number later or change it by using the edit booking option.
- Dock - mandatory field. Select a value from the list.
- Operation type - loading or unloading.
- Carrier - select from the list.
- Operation time - the default operation time is set automatically, but it can be changed.
- Booking date - after selecting a dock, the hourly schedule for the selected day will be displayed here.
- Vehicle no. - mandatory field.
- Semi-trailer no.

- Full name of the driver (and other additional data according to the settings of the booking template) - you can also add a second driver.
- Forwarding - option is automatically enabled, allowing you to forward the booking to the next carriers. It can be turned off.
- Shipper's remarks (Your company)
- Internal remarks (not visible for carrier) - here you can enter relevant information for employees of your company.
- Attachments - upload any important documents here.

When you have completed the details, click Save.

When a booking is created, the carrier will receive a notification and an initial booking will appear in your schedule.


Booking management
Once a booking has been confirmed, you can confirm and change its status from within the schedule by selecting the three dots icon next to the booking or in the booking details window.
- Click on the chosen booking to open the window.
- The prepared booking is awaiting confirmation of the vehicle's arrival at the warehouse site.
- Upon confirmation of arrival, you can refuse loading/unloading or start loading/unloading.
- Once the operation is finished, complete loading/unloading.
- When the vehicle leaves the warehouse area, select the Confirm departure status.

Determining the loading and unloading location
If you specified only the operation location at the warehouse when creating the time slot, you can also add the address of the second operation after the carrier's initial booking.
You can also edit a previously added address (except for the operation address assigned to your warehouse).
- Open the selected booking.
- Click More and select Change date and place of booking.
- Fill in the missing address (or edit the existing one).
- Click Save changes.
All changes are saved in the booking and time slot history.
If the booking was created based on an order, the addresses are fetched directly from the order and cannot be edited.
Flexible management of booking status
|
This option is available to users with the following roles: Full access, Dock Scheduler manager, Warehouse manager, Freight management, Order management. |
Flexible management of booking status allows for any change to the status of a confirmed booking. This is useful in case of errors, changes, or other issues.
- To change the booking status:
- Click on the booking to view its details.
- Click Change next to the booking status.
- Select the status you want to change to from the drop-down list.
Example: Booking status "Departure" has been changed to: "Loading in progress"

The carrier is informed about the changes in real-time in the booking on their side of the Dock Scheduler.

- In the booking details window, under the More button, you will find the following options:
Loading refusal and Delete booking - both options are available for every booking status.

- You can change the booking status with a past date. Select Bookings from the top menu, then set the date range you are interested in using the filter.

Example:
To change the booking status, we selected the booking from May 17, 2024 with the status "Not loaded". After clicking on the booking in the details window, we changed the status to "Departure".

After changing the details window, the booking status also changed on the list:

Edit a booking
It is possible to edit bookings without deleting them.
The carrier will be informed of any changes you make by a notification on the Platform and via e-mail.
- In the Schedules module, click on the three dots icon in the booking you want to edit and select Change booking date and place.

- In the Edit booking window, you can change the following:
- dock,
- operation time,
- date - using the calendar drop-down option,
- booking time.

- Once the changes are made, click Save.

- The booking will appear in the Schedule at the newly specified time, both on your end and on the carrier's end.


Edit booking time with Drag & Drop functionality
It is possible to edit the booking time by moving it with the mouse in the booking schedule.
- Left-click mouse button on the booking for which you wish to change the time. Drag the booking to the desired location. Free spaces are highlighted in green.
Then click the Move booking button to confirm the operation.

The booking can also be moved to the next page of the schedule:


- All changes are automatically saved in the drawer with the details and the booking history.

- You can extend the booking time within a dock:

You can move delayed bookings but remember that they must end later than the current time.
You can change the status of a booking up to and including Pending status.
The carrier can move bookings within a time slot.