Invoices module
Issuing invoices, corrections and debit notes, monitoring of payments - all these functionalities are available in one place. Issuing an invoice for the provided service has never been so easy. Why? In this article you will learn, among other things, how to do this with just one click.
Invoice settings
Before you start issuing invoices through the platform, choose the most convenient numbering format of invoices, corrections and debit notes. Define VAT rates, units, debit reasons or proposals for sales invoices.
How to do it?
- go to ‘More’ in the top right-hand corner
- select ‘Settings’ from the list

In the ‘Numbering formats’ tab choose format that you like most
- click ‘Edit’ next to a particular item
- select numbering
- confirm by clicking ‘Save’

In the ‘Dictionaries’ tab define all the items that you will use when issuing the above-mentioned documents.

Issuing invoices
An invoice can be issued in two ways:
- Based on a system order created on the platform by the orderer.
- Without an order, by completing all data yourself.
The first method is much faster. However, there is one dependency - a transaction must be accepted on the platform. Thanks to this, when the orderer generates an order in the system, you will be able to issue an invoice with just one click (all the data will be fetched from the order automatically). To issue an invoice for an order created in the system:
- from the Menu level, go to the ‘Invoices’ module
- click ‘More’ in the top right-hand corner
- select ‘Add invoice from order’ from the list

- on the list, filter a system order for which you want to issue an invoice
- select the appropriate item and click ‘Add invoice’

The other method requires completion of data by yourself. Thus, while being in the ‘Invoices’ module:
- click ‘Add invoice’ in the top right-hand corner
- complete mandatory fields
- ‘Save’ or ‘Issue invoice’

Invoice administration
There are four tabs in the ‘Invoices’ module
- Sales invoices
- Corrections
- Debit notes
- Payments

In the ‘Sales invoices’ tab you will find items with the following statuses:
- To issue (based on system orders issued for your company and those prepared to be issued, created by you)
- In preparation (used when an invoice was created automatically and misses some necessary data)
- Issued
- Corrected


For items with the ‘To issue’ status, you can perform the following action from the ‘three-dot’ menu:
- Issue an invoice

- Edit or delete an invoice

We are aware that data from orders does not always correspond to data in invoices. Thus, you have the possibility of editing invoices before issuing them. After clicking ‘Edit invoice’ next to a given item:
- make changes
- ‘Save’ or ‘Issue invoice’

For items with the ‘Issued’ status, you can download, preview, edit or correct invoices using the ‘three-dot’ menu.

When clicking on any item from the list of the ‘Sales invoices’ tab, there will show up a drawer with the following tabs:
- details
- contractors
- payments
- attachments

The ‘Corrections’ tab includes all the invoices which have been corrected or prepared by you to be corrected.

How to withdraw an invoice?
To withdraw an issued invoice:
- go to the ‘Sales invoices’ tab
- filter the invoice with the ‘Issued’ status
- click ‘More’ in the drawer on the right side
- ‘Revoke issuance’

How to correct an invoice?
In order to correct an invoice:
- go to the ‘Sales invoices’ tab
- filter the invoice you have issued
- select ‘Correct invoice’ from the ‘three-dot’ menu

- complete the correction invoice details
- ‘Save’ or ‘Issue invoice’

The ‘Debit notes’ tab is a place with all the debit notes issued by you and those which you saved to be issued.
How to add a debit note?
In order to add a debit note:
- click ‘More’ in the top right-hand corner
- select ‘Add debit note’ from the list

- complete all the required fields
- ‘Save’ or ‘Issue note’

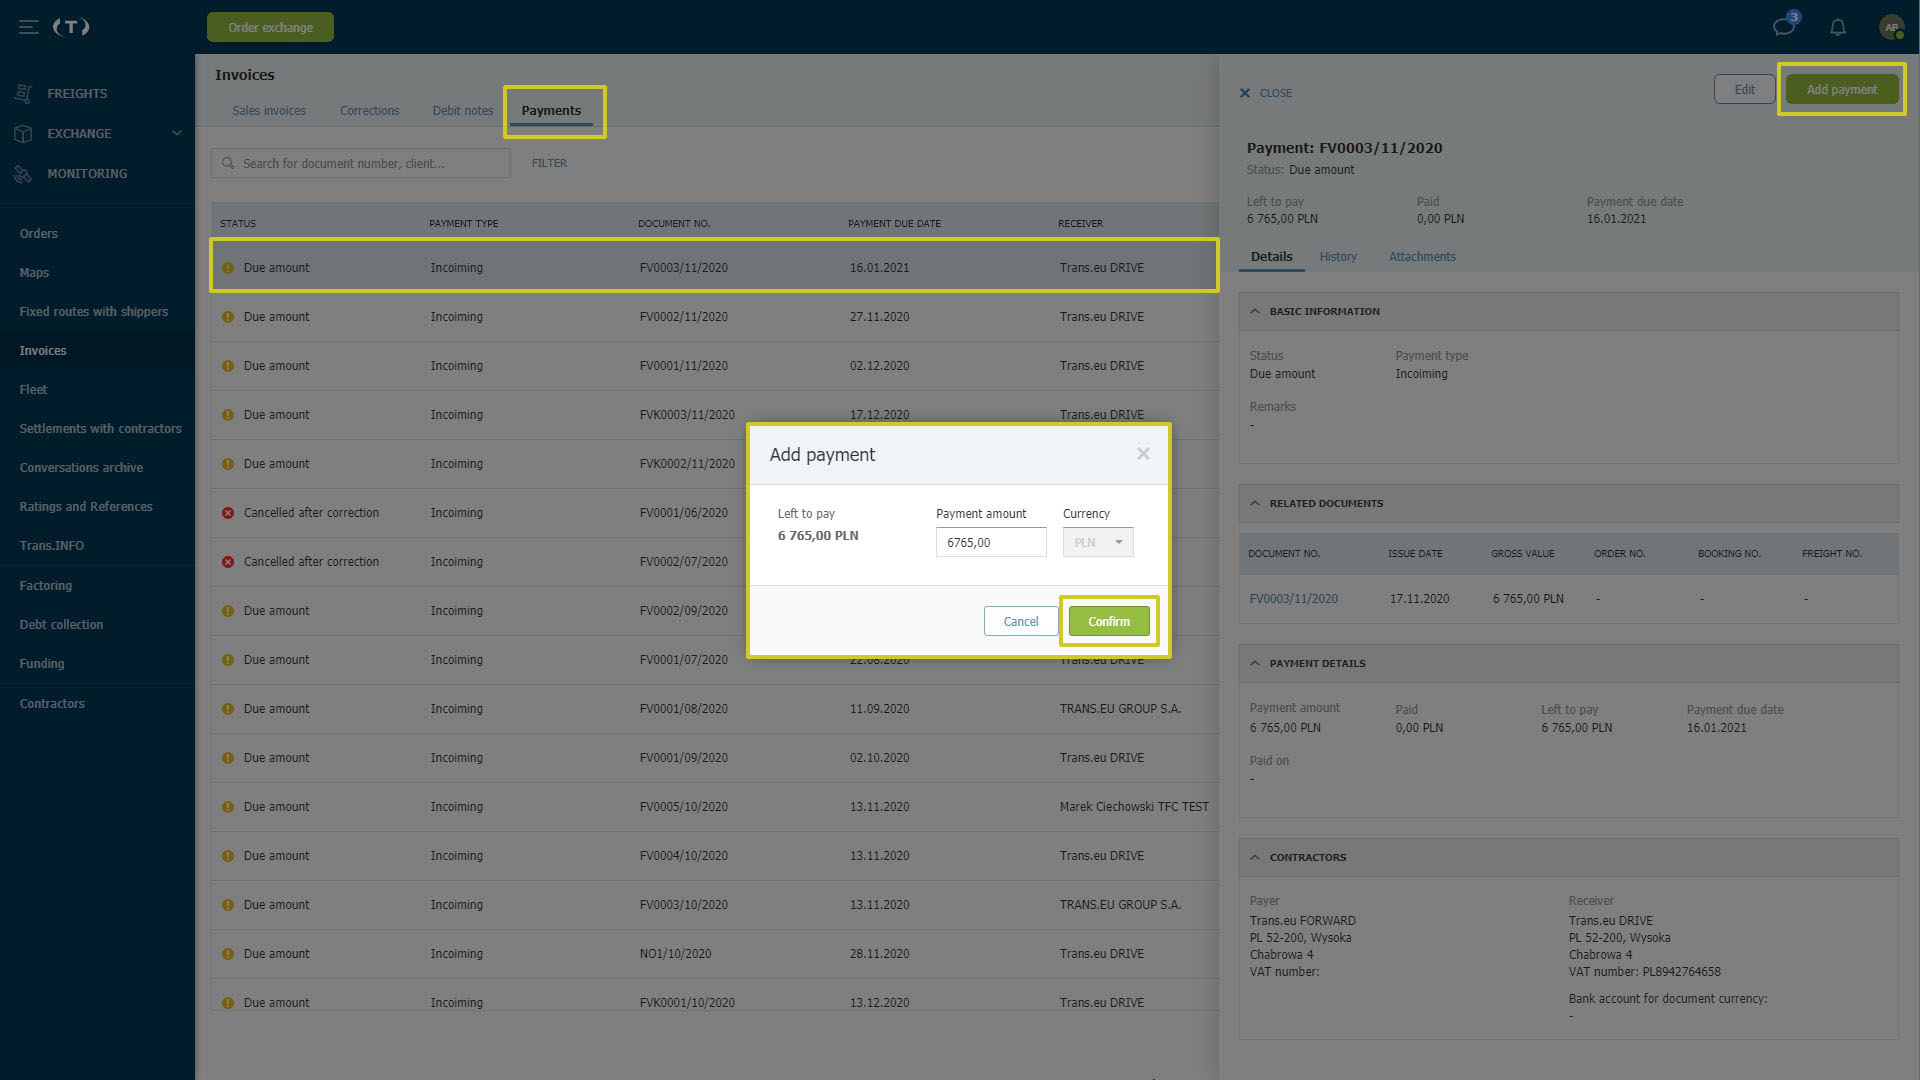
‘Payments’ is the last tab in the module. Every invoice issued on the platform creates a new item there, which allows you to register and monitor payments.
How to register payment of the invoice?
It can be done in two ways:
- Method
- Click any item from the list in the ‘Payments’ tab
- Click ‘Add payment’ in the drawer
- Enter the paid amount and ‘Confirm’

We know that contractors sometimes decide on payment in installments. That is why we introduced the option to edit the payment made so that you can monitor the remaining amount within the invoice issued by you:
- Click any item from the list in the ‘Payments’ tab
- Click ‘Edit’ in the drawer
- Enter the amount paid so far and ‘Confirm’

- Method
- go to the ‘Sales invoices’ tab
- click an item with the ‘Issued’ status
- go to the ‘Payments’ tab in the drawer on the rights side
- click ‘ADD PAYMENT’

- enter the amount paid
- click ‘Confirm’

How to add payment without issuing an invoice on the platform?
In the ‘Payments’ tab you can still register and monitor payments for provided services. In result, you will be able to control any outstanding payments.
How to do it?
- click ‘More’ in the top right-hand corner
- select ‘Add payment’ from the list

- complete data and ‘Confirm’

